RSS

Welcome

So glad that you have stopped by! Hopefully you can find what you are looking for or at least something that you can use!  You may notice if you visit over several days that the top posts don’t change.  That probably means there is at least one sticky post!  Any new posts will be below those so please scroll down!  Thanks for understanding and enjoy!

And I hope you like the new look! It must be the creative nature in me that I feel compelled to change my blogs theme time and time again! You think I could find one I like and stick with it but alas, that is not the case!

 
2 Comments

Posted by on December 28, 2009 in Uncategorized


Blog Award

Ok, so I will be the first to admit that I typically don’t do these things.  Not sure why but usually just don’t.  And I will also admit I was pretty surprised that I had even been chosen for one in the first place.  But

Krystine from http://lucyluvinyl.blogspot.com/ gave me a blog award! I am honored that she chose me and I do believe it a first for this blog.  Thank you very much!

The Rules for the award is that I have to name five reasons why I love crafting and pass it on to five other crafters(and acknowledge the person who gave it to me!).

Here are the five reasons I love crafting:
1. It allows me to relieve any stress that I may have! I think it usually makes me a happier/cheerier person to be around (at least for that moment! unless it is the night before a major show/event and i am trying to beat the clock! lol!)
2. I love to create things or recreate things.
3. I love seeing the creative side come out in my daughter because she in encouraged by my crafting and by me letting her work alongside me.  And I can’t wait until my son loves to craft too!
4. I love seeing the smiles I bring to the recipients of my work (especially my cards!)
5. It’s kind of fun to drive my husband crazy with all the random stuff I want to buy(just in case I need it later).  [Ok, this was so not my original answer but I thought it fit pretty well and I also believe my husband would agree with it!! I have at least 3 rubber maid tubs plus probably 4 other boxes of varying sizes of “stuff i might use later” sitting in my house right now!]

The five people I give this award to are(and they are in no order): [this is the hard part for me, so i will be back with them!]
1. http://modpaperie.blogspot.com/– Thienly is amazing! If you have never checked out her work, you should becuase you are missing out! Such and inspiration to me!
2. http://www.tipjunkie.com/– ok maybe not specifically a craft blog, but so much amazing stuff here! you have to visit Laurie, she will inspire you in many things!
3. http://www.modpodgerocksblog.com/– really the name of the blog says it all! ok maybe not all; you should visit Amy, you will find some amazing ideas there!
4.  http://www.make-it-do.com/– if you want inspiration on making it do, then you have to visit Calli. i love this blog because i know that i can make it do and it will be ok! thanks for the inspiration Calli!
5. http://paperpastime.blogspot.com/– Denise is a very talented and super nice lady, go check out her lovely craft projects!
6. I had to do a 6th one becuase I can not leave out this place– http://www.smartbuygal.com/forum/viewforum.php?f=11– ok, i know this is not a blog but i have to throw this out there for Kathy and all the ladies (and gents) at Smart Buy Gal Forums! they are an amazing group of very talented ladies and gentlemen.  thank you for the daily inspiration and friendship that i have found there!

 
Leave a comment

Posted by on March 7, 2011 in Uncategorized


More Vinyled Items

Here are few more pictures of some of the stuff I have been making lately.  Most of these were Christmas gifts for fmaily members but some of them were business orders.  Thanks for looking.

 
Leave a comment

Posted by on January 15, 2011 in Cricut, SCAL2, Vinyl


Missing in Action?

Breast Cancer Awareness water bottles

Well actually I think it would be closer to being AWOL than MIA! My poor blog how I have neglected you these past few months. I have been so busy with other stuff that I haven’t had made the time to come here and post.  So what has kept me away?  Well, life and family in general.  I know I say it a lot but the end of the year is a crazy time for us.  My husband is a pastor so he has a lot of stuff to do for church during the final months of the year.  And since right now he is an Interim Student Pastor at one church and an Interim Senior Pastor at another church the craziness is multiplied! Add on top of that all of the family things at the this time of year and it is certifiable around here!  I am talking 3 Thanksgiving (we only did 2 this year) and 3 Christmases plus all the church activities like musicals, staff parties, our kids stuff, the youth group activities and regular Sunday morning and evening church! Makes me tired even remembering it all!

And on top of that I decided to start up a little business. So I have been making things and attending craft shows.  I am off to a pretty good start and am hoping that things continue.  Here are a few pictures

one of my table displays

Green and Silver Believe in the Magic charger

 
Leave a comment

Posted by on January 15, 2011 in Cricut, SCAL2, Vinyl


Mothers Day

So I told you about my Mother’s Day gift a couple of posts ago.  Well, I decided to use my Mother’s Day gift to create a Mother’s Day gift! lol!  Initially this gift was supposed to be for my mother-in-law since we would be seeing her for sure on Mother’s Day (we live with her!). And I didn’t plan on seeing my mom for a couple more weeks.  However, on Sunday morning Josh and I had to run home to get something he forgot after we dropped everyone else off at church.  On the way to the house, I noticed that he was counting something in his head.  So I asked him what he was doing and he said he was trying to figure out if we could make it up to see my mom and the timeframe it would be.  So we decided to go see my mom! Yikes, now I needed a gift for her sooner.  So here is what I did.

I bought this vase at a garage sale on Saturday for $1, took it home and washed it in hot soapy water and let it dry.

Then I took a sheet of my Cricut Vinyl and put it on my mat.  Now the sheet of vinyl is 12×24″ and my mat is only 2×12″ but I didn’t feel like cutting the vinyl ahead of time (can’t find my trimmer) so I just lined it up and stuck it on the mat with the access at the bottom.  I knew it would be fine since my mat wasn’t that long. And it was.

Then I inserted the cartridge that I planned to use (Straight from the Nest) and loaded my mat.  You can see in the above picture how the vinyl hangs off the mat. While it was cutting at certain points I did support the excess vinyl as the machine pulled it in and out.  Not sure this would be necessary but I didn’t want it to get jammed.  Plus the desk I have my machine sitting on does not have a lot of room in the front of the machine to support the excess (or a longer mat).

Ok, here are pictures of what I used.  In the Straight from the Nest booklet I looked for a flourish that I really liked and thought would work well.  So as you can see in the left picture, I chose the flourish on page 69.  At first I chose to use the border and cut one of them at 2 1/2″. However after cutting it, I realized that it was long enough to wrap around the entire vase but I needed room for the word that I also planned to put on the vase.  So I recut using just the flourish and it was also cut at 2 1/2″.  You will probably want to set your multi-cut feature to at least a 2 and maybe even a 3. I used 2 and it worked but there were some areas that were not completely cut through, so changing the multi-cut count or the blade depth/pressure might have helped with that issue.  You will also notice that I chose to use the word “grow” on page 70. I liked this word, especially since it was going on a vase, but realize that each letter is connected together and it made it hard to get it onto the vase and I had to be extra careful about not tearing the letters apart where they were joined (some of the areas were very thin).

Here is a picture of the machine cutting and a picture of my first attempt.  Here is where I realized that the border flourish was not going to work like I wanted it to and also the words that you see I did recut.  I felt that were too small compared to the flourish and I did not use multi-cut on them so I couldn’t get them off correctly.  Oh well, live and learn.  So although there is not a picture of it, I recut the flourish twice and then the word “grow” twice more.  I made the word about 1/2″ larger than before and it looked much better.

I don’t have any pictures of applying the vinyl to the vase or of just the vinyl and vase.  But let me tell you that applying that vinyl was a pain in the rear.  I think it had to do with the fact that not only was the vase a round object but it also was tapered. So it was very hard getting the vinyl on as straight and in porportion as possible.  But it was ok.

Then I applied the etching cream in a medium thick coat.  It says to let it sit 5 minutes; I think I left mine on almost 10 minutes and I feel that it should have been left on longer. Probably at least 15 minutes.  But I was in a hurry as we were leaving for my moms in about 15 minutes and the gift was for her.  So I washed it off after about 10 minutes and removed the vinyl.  I could see all the little imperfections in it.  There were places that I didn’t get the vinyl down all the way although it looked like it at first glance.  Then there were the areas were I did not get any etching cream at all, plus the place that I got etching cream outside of the vinyl (no idea how that happened).  These are possibly all things that might not have happened or that I would have been able to fix if I had not been rushing to get the vase finished.

The believe it or not, I almost forgot to take pictures of the finished vase.  I rememberd about 5 minutes before we were getting ready to leave my moms to head home.  So enjoy her pretty roses in the vase (which she loved!).

You might notice that the flourish on this side is cut into the W.  I didn’t get the vunyl lined up right and this is the fix I came up with.  You can’t see it in the pictures but the words are not in line with each other; one is up higher then the other.  But the most important thing is my mom loved it and was so excited to get it and the flowers.  Of course the surprise visit from her daughter and family didn’t hurt anything either!

 
Leave a comment

Posted by on May 13, 2010 in Uncategorized


Teacher Appreciation Week

So, last week was Teacher Appreciation Week at my daughters school.  Of course she waited until late Wednesday night to say anything at all to me about it.  So I spent Thursday brainstorming and thinking of something that I could do quickly but would look nice and be used by the teacher.  I know that I for one don’t care to get (or give) a gift that is not something that i will use.  Of course the only exception is something that my little ones make me as a gift.

So I decided that I would use my Cricut and make some note cards for her teacher.  I really like note cards as a gift, especially premade ones that I can just grab and write in and send/give to the person.  It is nice to not have to hunt for some nice paper or try and find a store bought card that says exactly want you want it to say.

First, I sat down with my books from the Forever Young cart and the Wild Card cart and picked out the designs I wanted to make and wrote out all the layers that I wanted to cut and what colors that I wanted them to be.  I chose one of the purses from the Forever Young cartridge and decided on the embellishments. I used a 12×12″ peice of cardstock in a pretty charcoal gray color, loaded it into the machine, and set it to fit to page.  This made the machine cut the purse at 5 1/2″ in size.  Since I already had a list of everything and the colors laid out I was able to get through the cutting fairly quickly.  The most time consuming part at this point was removing the pieces from the mat.  That take some time.  Just a note, my cards and envelopes ended up getting resized part way through the cutting process and I am not sure how.  I think I accidentally bumped the dial at some point.  Plus I was trying to cut more than one designs layers at the time I had that color of paper in and I think that somehow messed things up as well.  But in the end it was ok, not perfect but giveable.

Here is my pile of all the pieces before assembling; doesn’t look like much.

Try and ignore my messy desk! It is my computer and craft desk and pretty much where I spend the majority of my time.  I didn’t take individual pictures of each card as I made them but here is a picture of all the pieces assembled.

I love the purse! It is super cute and I really didn’t want to give it away, but I did.  I had planned on 5 cards to put inside the purse to give but for some reason when i was done assembling I only had 4.  So I decided to through in the little butterfly card I made previously.  Also I am not sure what happened to it but I could not find the envelope to the blue “just a note” card in the bottom corner.  And I didn’t make another one becuase the card was too large on its own and the envelope would have never fit in the purse. So it got sent without an envelope. Sometimes you just need a card without the envelope, right? That what I kept telling myself.

The card in the upper left corner is actually the card for the teacher from Sarai.  It is a blue ribbon on the outside and then the inside (which shows through the middle) reads “#1 Teacher”.  I also forgot to cut the liner for the inside, so I just cut a small rectangle of white cardstock and adhered that inside.  Everything was put inside a small gift bag along with a small box of chocolates.

And so you know, she loved it! I got an email from her that day thanking me and telling me how much she loved them! So I was happy.  And it really only took me about 2 hours start to finish.  I made sure I watched Survivor first and then skipped the Mentalist and was able to catch the tale-end of Fringe. Not bad for a great little gift.

**My favorite cards are the scalloped gray one and the little green one. They were so cute.  And Sarai has already picked out what purse she wants for herself!

 
Leave a comment

Posted by on May 12, 2010 in Cricut, Forever Young, Wild Card


My First 3 Cricut Projects

Ok, so you seen my post about getting my new Cricut Expression, right? So here is my first ever project that I did on it.  Nothing to fancy or complicated, so you might not be impressed.  But I was impressed. Impressed by the fact that this little card took my all of 10 minutes to create.  And that sentiment on it; yeah, I would have never tried to cut something like that by hand! No way!  So here you go:

Like I said nothing to complicated or fancy about that.  But it was super easy and fast and I think it is cute. Now I just need to figure out who to give it to. Shouldn’t be to hard.  By the way, it was cut from the Wild Card cartridge and I can’t really tell you what size I cut it at since I didn’t write it down. Sorry.

So on to project number 2.  The Forever Young cartridge is one of my favorties (so far) and I love all of the little purses on it.  Btw, if you have a  little girl that is into Barbie right now and you want to do some cool custom things for a Barbie party you have got to get this cartridge! It would work perfectly.  My “little” girl will be 11 on her next birthday and a Barbie party didn’t appeal to her when I mentioned it.  And I don’t think daddy will let me throw one for Micah anytime soon! lol!

Anyways, I decided to make on of the purses on the cartridge because they are just so stinkin cute.  One downside was that I only had 8 1/2″ x 11″ paper so I knew that it was going to be tiny.  But I forged ahead with my plans.  And here is what I ended up with

Isn’t it adorable?!? So sorry for the flash glare on the purse.  It is actually a dusty rose color and the insert is hunter green and it is a lot cuter in person than it appears in this picture.  So after I cut it and assembled it my son (who is almost 2) came in the room and promptly claimed the purse as “mine”! So I explained to him (as much as you can to an almost 2 year old!) that it was not his and that purses are for girls.  So my son being the smart one he is proceeded to tell me that is was Maya’s.  So the purse project has now turned into the purse gift for Maya.  If you want to know who Maya is, you should read this post.  But just briefly she is one of Micah’s best friends and she is moving soon and it is very sad for our family.  So the plan is to put a couple little hair decorations and a small bottle of finger nail polish in it and give it to Maya. I will take some pictures of it when it is ready to go.

And last but not least, the third project that I did with my bug.  This is one of my favorites, because of the colors and the butterfly! Love that butterfly!

I love the combination of the purple and teal cardstocks together.  I did mess up on this one though, however you can’t see it in the pictures because it doesn’t effec the project you see here.  When I was prining the parts to the butterfly (base and filigree wings) I accidentally cut the wings too big. Not sure how I did it but it happened.  So I just recut the wings smaller and then cut me a body big.  So then I had the parts to create another butterfly for a future project! Pretty spiffy (and I will show you how I ended up using it in the future).  This card was also off of the Wild Card cartridge, again I didn’t write down any of the sizes since I was really just playing around with my new toy. But in the future I will write them down for you.

Enjoy!

 
Leave a comment

Posted by on May 11, 2010 in Cricut, Forever Young, Wild Card


My New Toy

So recently I got a cool new toy and I didn’t even tell you about it! Shame on me.  This cool new toy has quite the story behind it.  But the most important thing is that I now have one and I am loving it!  Thanks hunny!

Although, I bought for myself (with dh’s paycheck! lol!), I still count it as my Mother’s Day Gift.  I even got it about 2 weeks before Mother’s Day.  But thats ok, dh paid for it and I didn’t really want anything else for MD so its all good.  I even told him he could count it as part of my anniversary gift.  Its coming up in 2 months; kind of hard to believe that we will have been married for 14 years and together for almost 18 years! WOW, time sure does fly when having fun!

But anyways, back to my new toy! It is a Cricut Expression (the big one)! And I am loving playing with it.  I have done several projects on it.  And while only a couple have turned out perfect thats ok because there is a learning curve.  And the others, while not perfect, were good enough to still give away as the gifts they were planned to be!

So here is my bug, nestled safe and snug in its shipping container.

Here is what was inside the package (the goodies)!

I bought it off of HSN because they had some of the best prices, the best package deals and the best part was that they offer FlexPay. Which is a nice option if you don’t want that  large of an amount to come out of your bank account all at once.

So as you can see, my package included not only my machine, the spatula, the mat and replacement blades; but also 4 cartridges (Sentimentals, Songbird, Forever Young and Straight from the Nest), a package of vinyl, bottle of etching cream, and all the manuals and software.  I also got the Cricut Tools, which included a bone folder, pair of scissors, craft knife, little pick thing, a ruler and something else. Ha, hows that for descriptive!

Then a couple days later, I also bought the Wild Card cartridge.  Most of the cartridges that I buy in the future are going to be ones that I can use in card designing and for home decorations or gifts.  Mainly because I do all my scrapping on my computer (digitally) and I don’t plan to do much paper scrapping in the future.  The only way I would is if I am making a quick little gift album for someone.

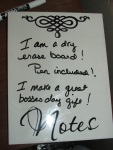
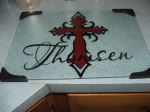
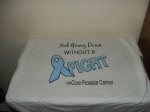
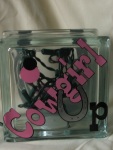
So come back and see some of the projects I have already done with my bug! But remember I am only a beginner!  But in the future I may try my hand at svg and cut files for you! Woah, that sounds scary even typing it.

 
Leave a comment

Posted by on May 10, 2010 in Cricut


April Showers

April Showers is the DSI April Collab.  I know that I may be a little biased but Digital Scrap Ink has one of the best monthly collabs that I have used.  I have loved every months kit that they have released since they started doing monthly collabs.  They are top quality, great theme and great variety.  You really need to check them out if you haven’t before.  This collaboration of DSI designers includes 33 papers in .jpg format and 50+ elements (with recolored and shadowed versions).  There are also some extras included such as 5 solid papers, 2 templates in .psd, .png and .tiff format, 1 alpha (upper case letters only) and 1 set of matching styles.  It is an amazing kit. Here are some more previews of the collab for you to enjoy!

Here are some layouts that I have done using ths months collab:

And because I really want you to want this collab too, I have made a couple brag book pages to get you started!  Hope you like them and don’t forget to go grab April Showers.  And as an added bonus if you spend $10 in the DSI Shop you can get April Showers for FREE!

Enjoy!

 
1 Comment

Posted by on April 13, 2010 in Uncategorized


BTA Designs

This month at Digital Scrap Ink, BTA Designs in one of our Guest Designers.  Since she is a guest, I was able to choose from her products to work with as my monthly CT requirements.  And since I love templates (and you know that to be true if you have visited any time before), I chose to work with her Color Lovers Vol 1 Templates.  And I must say I loved them!

Here are some layouts that I created with the templates included in Vol. 1:

And because Bre (BTA Designs) is so nice and generous, she agreed to let me turn one of her templates into a Quick Page and give it to you for FREE! How great is that!  Just click on the page below to download! Enjoy!

And if you head over to Bre’s blog you may be able to still pick up a FREE template (and clues to find her eggs with coupons that are still available).  The last time I was there, they were still active; so hurry on over!

The kit used above is called Perfect Match and it is by Foxy Designs.  If you come back in a couple of days, I will tell you more about it!

 
2 Comments

Posted by on April 12, 2010 in Uncategorized


Easter Layouts, New Alphas and a Freebie

Today I want to share with you some of my Easter layouts that I have done already.  I plan on doing quite a few more since I have a TON of pictures from the Easter weekend.

First up is Coloring Eggs.  This layout features my son, one of his eggs, and the final bowl of eggs.  I love his expression in the picture where he is showing me his egg.  He was so proud of himself for completing that egg.  The sad/funny part is after he went to show daddy his egg and was on the way back to put it up, one of the dogs tripped him and he smashed the egg!  It was funny and sad at the same time!

This layout has several great products used in it and in case you are loving any of them I am going to tell you where you can go and get them for your very own stash!  All of the papers and elements (except alpha) are from the DSI April Collab– April Showers.  It is a great kit and very pretty and versatile.  I will tell you more about it tomorrow so come back.  The alpha is a seperate product and is called Spring Fling- Blue and is by Foxy Designs. It is not yet available in her store but will be soon!  And it also comes in Pink and Green.

The second layout I want to share with you is the Cousins.  This layout is of my two kids and my niece and nephew on Easter morning before church.

For this kit, you will notice that I again used Foxy Designs Spring Fling alphas but this time in Green and Pink.  I love this alpha and will probably be using a lot of it in the future.  For the papers in this kit I used Designs by Sweet Mesquite Easter Hop freebie!  They are some great papers.  They aren’t available as a freebie any more (only for Easter) but maybe she will be putting them in her store.

For both layouts I used templates from BTA Designs, who is guest designing over at DSI this month.  I got the change to work with her Color Lovers Vol 1 Templates and really enjoyed using them.  Of course I am a template junkie and love just about any template I can get my hands on.  They really make my scrapping a lot easier and faster.

And because I am so glas that you read to the end, here is a little word art freebie for you.  It was made using Foxy Designs Spring Fling alphas.  Enjoy!

Just click to download!